
Home Recording and Studio Basics
Updated: 2026-07-12After this lesson, you will be able to trace a complete piano capture-and-monitor route, use an input meter to set a healthy signal with headroom and no clipping, begin monitoring at a low listening level, and save three clearly named home-recording takes.
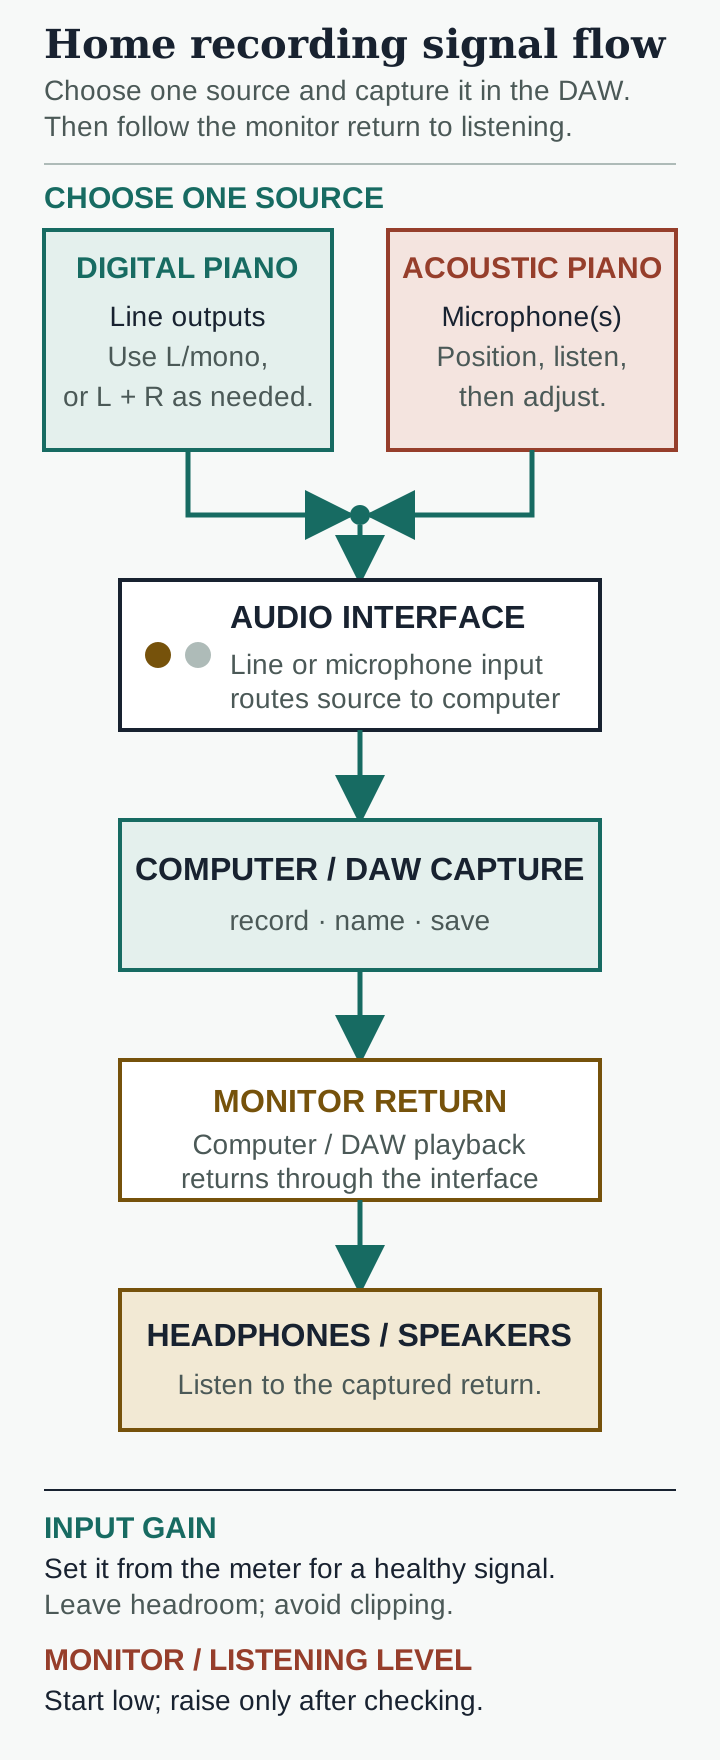
Try now
Point through the diagram twice. First say the capture route from piano source to the recorded file. Then say the monitor return from computer through interface to headphones or speakers. Identify which control follows the input meter and which listening control begins low.
Keep capture and monitoring as two routes
For a digital piano or keyboard, the approved route is its line-level output into an audio interface line input, then the interface into recording software on the computer. Focusrite notes that keyboards commonly provide line-level outputs and that each output being captured uses an interface input. Choose mono or stereo according to the instrument manual and your available inputs; this lesson does not prescribe cables or wiring.
For an acoustic piano, one or more microphones feed appropriate interface inputs before the same computer capture stage. Shure emphasizes that microphone choice and placement change the result and recommends placing, listening, and adjusting. There is no universal distance in this lesson. Use the microphone, interface, and piano manufacturers’ instructions for connection and operation, and ask qualified help when the setup is unfamiliar.
The return path is separate: recording software sends playback through the interface to headphones or speakers. If capture exists but playback is silent, trace the return rather than raising input gain. If playback exists but the recorded waveform is empty, trace the source and capture path.
Set input gain from the meter, listening from the monitor control
Play the loudest passage you expect to record while watching the input meter. Raise or lower input gain until the signal is clearly present, retains headroom, and never reaches clipping. A clipped take cannot be repaired by turning down the speakers afterward. Do not set gain by how loud the headphones feel; that is the monitor path.
Before playback, set the headphone or speaker level low, begin playback, then increase only to a comfortable working level after checking. CDC/NIOSH advises musicians to reduce sound level when possible, monitor exposure level and duration, and use quiet breaks. This lesson therefore starts conservatively and gives no promise that one setting is safe for every person, device, or session.
Run a small, repeatable session
Create one folder and one track. Name them with date, piece, and take number. Confirm the intended input, record ten seconds, stop, and inspect the meter or waveform. Listen once for complete capture, obvious clipping, and route noise. Correct one issue before recording the full excerpt.
Record three takes of the same 30–60 second original or authorized passage. Do not change microphone position, instrument sound, gain, and performance plan all at once. After each take, name and save it immediately. Consumer equipment can document practice and produce useful results, but this workflow does not promise professional quality; performance, instrument, room, placement, equipment, and recording decisions all affect the file.
Exercise
Draw two arrows on paper: source → interface input → computer/recording track and computer/playback → interface monitor return → headphones or speakers. Then complete a test and three-take session. Before take 1, play the loudest passage and set gain from the meter with no clipping. Start listening low. Record three matching excerpts, save date-piece-take-01, -02, and -03, and write one observation per take about performance or capture. Keep the routing and gain fixed unless the meter shows a specific problem.
Common mistakes
- Symptom: Headphones are loud, so input gain is assumed correct. Correction: Judge input gain only from the recording meter and clipping indicator.
- Symptom: A clipped meter is accepted because playback can be lowered. Correction: Reduce input level before recording another take.
- Symptom: Playback silence leads to more input gain. Correction: Trace the monitor return from software through interface to output.
- Symptom: Every take changes several variables. Correction: Hold the route fixed and change one evidenced issue at a time.
Practice pack
Prepare
Open one session folder, name one track, and trace capture and monitor paths aloud.
Core drills
Set gain from the loudest passage, record ten seconds, inspect, then make three complete takes.
Variations
Compare mono and stereo only when the instrument documentation and available inputs support both.
Self-check
Pass when every file has signal, no clipping, a clear name, and the same intended route.
5-minute route
Spend one minute routing, one metering, one test, and two recording and naming a take.
15-minute route
Spend three minutes setup, three test and meter, six on three takes, and three reviewing and logging.
Frequently asked questions
Do I need expensive equipment for this lesson? No. Use equipment you already understand to make a clear practice record. The lesson makes no professional-quality promise.
Where exactly should I place a microphone? There is no fixed distance here. Place, listen, and adjust within the manufacturer’s guidance; room, piano, microphone, and desired balance vary.
Should input gain start low too? Set input gain by the meter while playing the expected loudest passage. The separate listening level starts low before playback.
Ready to continue when
- You can trace capture toward the computer and monitoring back through the interface.
- Input gain follows the meter, retains headroom, and never clips.
- Initial headphone or speaker level is low and separate from recording gain.
- Three 30–60 second takes are captured, named, saved, and reviewed without a quality guarantee.